Specan – A Spectrum analyzer
Specan – A reboot of the W7ZOI/K7TAU
An easy to build spectrum analyzer for the homebrewers
Show me what you got!
For those who can’t wait to see the circuit diagram, here it is (the Arduino hookup is a little way down on the page):
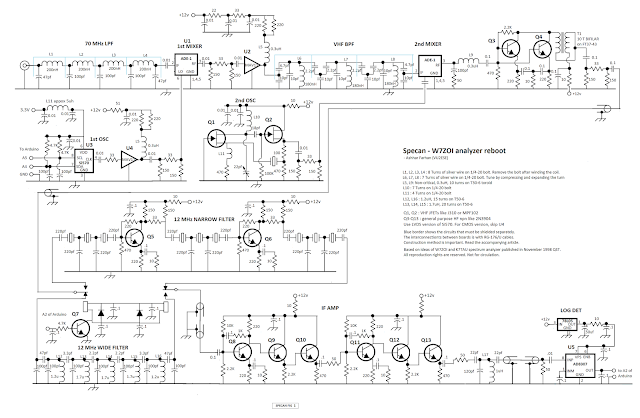
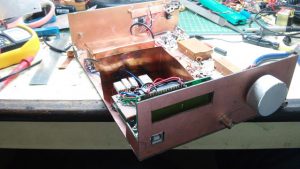 The Specan is actually a very simple but robustly built receiver. it is, in essence, a double conversion superhet receiver with 112 Mhz and 12 Mhz Intermediate frequencies. The first mixer uses an Si570 as the local oscillator. The second oscillator is a crystal controlled at 100 MHz; built with a common microprocessor crystal of 20 MHz. Unlike most radio receivers, the second IF has two filters : a narrow band crystal filter with 1 Khz bandwidth and a wide band LC filter with 300 Khz bandwidth. The detector converts the tuned signals into a log scale. The detector output is a decibel measure of the incoming signal.
The Specan is controlled with an Arduino board. The Arduino controls the Si570, handles the front panel, talks to the computer over the USB port, reads the detector and switches the filters.
In a very simple usage, the Specan can be tuned around like a regular radio. Instead of listening to the signals, you read their strength on the LCD display.
You can switch between wide and narrow filters : using the wide filters to hunt for signals and then use the narrow filter to locate and measure them with greater precision. This in itself is quite a useful function. It is possible to measure intercepts, gains and harmonics without using a computer.
Under a PC’s control, the Specan can be made to step through any sequence of frequencies and plot them on the computer screen. The Specan understands a handful of text commands sent over the USB port of the Arduino.
The Specan also accomplishes a long standing personal goal – to make the homelab at VU2ESE entirely homebrew. The Specan can easily replace our aging TEK 465 scope and do even more.
This Specan can be built for far less than hundred dollars. Though it needs quite a few evenings of work. Construction is straightforward.You won’t need any special tools. Modules of the Specan are used to align the rest of it! The Specan serves as its own set of test and alignment gear!
What you need to build one
The Specan must be built one stage at a time. Over evenings the builder will bring each stage to life. Each module is calibrated using the previously built modules. As high-performance is a requirement, each stage needs extensive shielding.
Though the circuit is only as complicated a simple transceiver, each stage has to be built individually, tuned up and shielded properly. It is all done quite easily. It just takes a bit of effort to take care of the small things and not rush through it. You are building an instrument that will last a long time. Take your time!
You will need temporary access to a well calibrated 10 Mhz receiver or a frequency counter for a calibrating the Si570. The rest of the tune-up is done by the Specan itself.
A plug for another piece of test gear that I designed – The Sweeperino I highly recommend building the Sweeperino. It consists of the three easiest to build modules of the Specan (the Arduino, the power meter and the Si570). Hook up these three parts as a digital controlled sweeper. The Sweeperino will help you align the Specan. It is documented here.
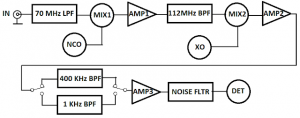 The incoming signal is filtered through a 4 section low pass filter before entering the 1st Mixer. We used a two dollar ADE-1 mixer from Minicircuits. You could choose a higher level mixer in it’s place, but this is what was available in the junk box so this is what was used. The 1st mixer is driven by a local oscillator that consists of the LVDS version of Si570 amplified by an MAV-11 MMIC. The mixer is followed by a strong amplifier (AMP1) that also consists of another MAV-11. This amplifier helps terminate the first mixer properly. (Yes, we did try bypassing this amp for the heck of it, it brought the input intercept down to 0 dbm, you could substitute it with a 6db attenuator pad with a drop in the noise figure). The AMP1 also provides a useful gain of 10db. The signals are then filtered through a band pass filter centered around 112 MHz and mixed in a second ADE-1 mixer (MIX2) with a 100 Mhz crystal oscillator. The output of the second mixer is in HF region, two low-cost 2N3904s are used in parallel as a high intercept post-mixer amplifier (AMP2). The 12 Mhz IF signals are routed through either a narrow band crystal filter or a wide band LC filter. The IF is amplified by the second IF amp (AMP3) to a level suitable for the AD8307 log detector. The AD8307 generates a DC voltage between 250mv and 2.2V as the log of the RF input with a 25mv per db ramp.
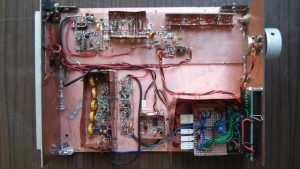 (This photograph is with the shields removed. the Si570 shown here was CMOS version without the MAV11 amp)
Here are a number of things you must know before starting to build the Specan
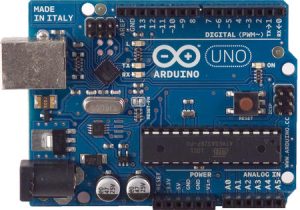 The Specan uses Pin 2 to Pin 7 from the top row of connections and Analog pins 0 to 5 in the lower row (see the above picture). In addition to that, the USB port is used to talk to the PC. The Arduino is usually set to take power from the USB port. We want the Arduino to work even without a PC connected, hence we power it from an external 5v regulator. This is how you prepare the Arduino :
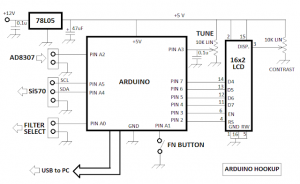 Once your Arduino is all wired up, you can load the Specan program into it. Here are the steps:
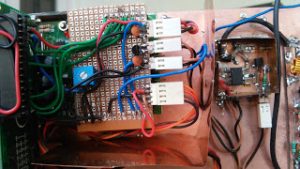 The Arduino controller is under the veroboard. The log amp is on the right
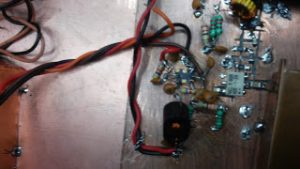 The Si570 without the MAV11 (these pictures were taken before I switched to the LVDS version of Si570)
 The AD8307’s power reading are un-caliberated at the moment, but our initial alignment only needs relative readings.
 The Specan has a total of four filters that need to be carefully built and shielded. The 70 MHz low pass filter is the simplest of them all.
Each of the coils is made by winding 8 turns on 1/4-20 bolt as a former. Remove the former after winding the coild. They are best made with silver wire, we used 22swg copper wire in the prototype.
A strip of five pads is cut in a double side PCB. The coils are soldered across the pads. The capacitors are soldered between the pads and the ground plane. Keep all the caps on the same side of the strip. Drill a number of tiny holes on the PCB and solder small pieces of wire to extend the ground plane to the bottom side as of the copper clad board as well.
The entire filter is shielded and a each coil is shielded from the other as well.
Small flaps are left out on the two ends of the shield to bring the input and output to the other parts of the Specan.
The LPF filter can be tested easily with the Sweeperino
 Note : the coils are shielded from each other. the final shield around the BNC connector is not shown here
 The circuit is assembled on a double side, unetched board with seven pads of 0.2 inches each made in a row with a box cuttter. The 2.2pfs are soldered between every pad except the end pads that have 4.7pfs. The 10 pf capacitors are soldered between every pad and the ground. Keep all the 10 pfs facing one side. Solder the coils’ ground ends on the same side as well. All capacitors are SMD.
Shielding the VHF filter is very important. Solder the a 1 inch walls of copper sheeting or copper clad between the coils. Take care to cut small apertures in the bottom of the shield to prevent the copper pads from being shorted to the shield.
There were no 4.7pf capacitors in the junk box, we used two 2.2pfs in parallel.
Aligning the filter is not difficult at all.
 The wide HF filter uses 5 resonators. The inductors are wound on T50-6 toroids. They can also be air wound if the one can expend the extra effort of shielding them individually. We used a copper clad board about 4 inches long and 2 inches wide to accommodate both the HF filters and the switching relays. The entire module of HF filters is shielded with copper sheeting. There are two outlets at the two ends for input and output. The power and filter selection lines are well bypassed while bringing them inside the shield to prevent stray RF pickup.
This wide band filter is assembled on a single strip of pads cut into a copper clad board similar to the VHF band pass filter. Aligning them is similar. Set the Si570’s output to 12 Mhz with ‘f12000000’ command from the Serial Monitor and peak the output by moving the turns on each of the them for the best response.
The narrow band filter needs no alignment. Just use 12 Mhz crystals that were matched to within 100 Hz of each other. All the nine crystals need to be matched to each other. Solder the bodies of the crystal to the copper board.
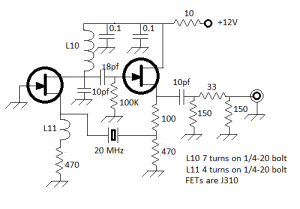 Building overtone oscillators has been a challenge in the past. This new design is based on the work of John Stephenson, KD6OZH in the QST of November, 1999. It is a very low noise oscillator – exactly what is needed to complement the low noise of Si570 in the first oscillator. This version oscillates very easily and without needing a coil in parallel with the crystal.
Tuning up this overtone oscillator is an old trick from EMRFD. Replace the crystal with a 22 ohms resistor in series with a 0.01 uf capacitor. Switch on an FM radio nearby and tune it to exactly 100 Mhz (use a radio with digital display). Compress and expand L10 until you can hear the signal in the FM radio (the signal will appear to make the radio dead silent). Tune the radio around and confirm that the peak of the signal (maximum quiteness) is at 100 Mhz. Now, replace the resistor and capacitor with the crystal. You should be able to hear the signal again. You might have to (very lightly) touch up the L10 for proper oscillations.

Analog Circuit of the Specan
- (A better, higher resolution diagram can be downloaded here: from my G Drive) If you don’t want to read this long long write-up, here is a summary:
- This spectrum analyzer costs less than $100 to make.
- It is just a superhet radio that has a log amp where the speaker should have been.
- You can hack it. It has an Arduino.
- Works as well as a commercial spectrum analyzer. In some ways, even better.
- Works only upto 70 MHz (good enough for HF work, for VHF just remove the LPF)
- It has just two resolution bandwidths : 300 KHz and 1 KHz. Quite enough for our kind of radio work.
- You have to align the filters. Easily done, but still, you have to do it.
- You use parts of the specan to align other parts. In this sense, it aligns itself!
- Works with a PC instead of an oscilloscope for display.
- It has a built-in LCD for quick readings
- +15dbm IIP3, spur free dynamic range of 80 db at 1 KHz resolution, 70 db at 300 KHz.
- Tunable in 100 Hz steps.
- All under GPL v2.0 license.
Why do I need a spectrum analyzer?
Most of the homebrewers have a very basic measurement setup. Often we get by with just a VOM, an RF probe and maybe a frequency counter. The more ambitious experimenters aspire to acquire an oscilloscope – an expensive item. These instruments are quite useful but not enough for RF tinkerers. Often times, we homebrewers end up using the following:- An RF Probe This costs nothing to make. Coupled with a dummy load, it can provide reasonable measurement of power levels of RF signals from a milliwatt upwards. But it offers no insight into the frequency of the RF signal
- A Frequency Counter For a few dollars, we can program a PIC and an LCD display to display the frequency of an RF signal. However, the frequency counter does a very poor job. Imagine feeding a diode modulator’s output to the frequency counter. What would it read? the Modulation frequency? The carrier frequency? The upper side-band or the lower side-band? Your guess is as good as mine. When it comes to RF signals that have multiple frequency components like most of our RF circuits do, the frequency counter becomes useless. At best, you can use it to measure the frequency of your new VFO’s oscillations, but that’s about all you can do with it with any accuracy.
- The Oscilloscope A few hundred dollars buys you an oscilloscope that can show you the exact waveform. Well, nearly exact. You could look at a sinewave and say that it is clean or not. But, consider this, a power amplifier with a second harmonic that is just 40 db down (and hence illegal to use on the air) will not register on the oscilloscope waveform at all. That is a variation of only %1 of the waveform from its expected shape. You won’t see that on your beloved ‘scope. You will more!
- Show how well your DSB modulator is suppressing the carrier, down to 0.2db
- Locate your VFO’s frequency and it’s cleanliness. With a little effort, even the phase noise.
- Plot your antenna’s VSWR across the HF spectrum.
- Check your QRP transmitter’s harmonics and other emissions.
- Measure the input and output impedances, well actually, the impedance mismatch.
- Measure distortion and overloading of the mixers, amps, receivers, transmitters.
- Plot any filter’s passband shape.
The November 1998 QST carried an amazing series of articles by Wes Hayward, W7ZOI and Terry White, K7TAU. You can read them both here and here. They lay out the details of a spectrum analyzer that could be built at home. It is a classic. Even if you are not interested in spectrum analyzers, this series of articles forms the most compact introduction to high performance receiver design I have ever seen.
The W7ZOI/K7ATU analyzer made very intelligent trade-offs. It limited itself to HF work and it had just two resolution bandwidths. The 300 KHz bandwith is useful to see the entire HF spectrum to pick up spurs and harmonics and the 8 KHz bandwidth was for measuring IMD. This made the W7ZOI/K7ATU spectrum analyzer as complicated (or simple) as a simple SSB rig. Almost 15 years later, I attempted to replicate their spectrum analyzer : improvising where I didn’t have the original parts and redoing others where newer technology was available. The really big change was incorporating an Arduino controller with an Si570 as the local oscillator. This article describes a new version of the W7ZOI/K7TAU spectrum analyzer, now simply called the Specan. I have included the small details that are essential to building a high performance spectrum analyzer. The differences between my design and the original are as follows:- The local oscillator is an Si570. This allows us to tune finely down to 1 Hz steps.
- Having a stable, finely tuned spectrum analyzer allows for very narrow resolution bandwidth. You can now measure the distortions inside the pass-band of a transmitter.
- The Arduino also handles a front-panel LCD display and tuning knob making it useful as a measurment receiver as well.
- Instead of an oscilloscope, the spectrum is plotted on the PC. This saves the cost of an oscilloscope.
- The IIP3 of the Specan is about 10 db below that of the QST analyzer due to the ADE-1 mixers. However, narrower resolution bandwidth of 1 KHz gives us the desired 80 db spur free dynamic range for the close-in distortion measurments.
How it works
 The Specan is actually a very simple but robustly built receiver. it is, in essence, a double conversion superhet receiver with 112 Mhz and 12 Mhz Intermediate frequencies. The first mixer uses an Si570 as the local oscillator. The second oscillator is a crystal controlled at 100 MHz; built with a common microprocessor crystal of 20 MHz. Unlike most radio receivers, the second IF has two filters : a narrow band crystal filter with 1 Khz bandwidth and a wide band LC filter with 300 Khz bandwidth. The detector converts the tuned signals into a log scale. The detector output is a decibel measure of the incoming signal.
The Specan is controlled with an Arduino board. The Arduino controls the Si570, handles the front panel, talks to the computer over the USB port, reads the detector and switches the filters.
In a very simple usage, the Specan can be tuned around like a regular radio. Instead of listening to the signals, you read their strength on the LCD display.
You can switch between wide and narrow filters : using the wide filters to hunt for signals and then use the narrow filter to locate and measure them with greater precision. This in itself is quite a useful function. It is possible to measure intercepts, gains and harmonics without using a computer.
Under a PC’s control, the Specan can be made to step through any sequence of frequencies and plot them on the computer screen. The Specan understands a handful of text commands sent over the USB port of the Arduino.
The Specan also accomplishes a long standing personal goal – to make the homelab at VU2ESE entirely homebrew. The Specan can easily replace our aging TEK 465 scope and do even more.
This Specan can be built for far less than hundred dollars. Though it needs quite a few evenings of work. Construction is straightforward.You won’t need any special tools. Modules of the Specan are used to align the rest of it! The Specan serves as its own set of test and alignment gear!
What you need to build one
The Specan must be built one stage at a time. Over evenings the builder will bring each stage to life. Each module is calibrated using the previously built modules. As high-performance is a requirement, each stage needs extensive shielding.
Though the circuit is only as complicated a simple transceiver, each stage has to be built individually, tuned up and shielded properly. It is all done quite easily. It just takes a bit of effort to take care of the small things and not rush through it. You are building an instrument that will last a long time. Take your time!
You will need temporary access to a well calibrated 10 Mhz receiver or a frequency counter for a calibrating the Si570. The rest of the tune-up is done by the Specan itself.
A plug for another piece of test gear that I designed – The Sweeperino I highly recommend building the Sweeperino. It consists of the three easiest to build modules of the Specan (the Arduino, the power meter and the Si570). Hook up these three parts as a digital controlled sweeper. The Sweeperino will help you align the Specan. It is documented here.
How well does it work?
It has an input intercept of +15dbm and a display range of more than 80 db at -20dbm level when scanning with the narrow band filter and 70 db with the wide band filter. It works from DC to 70 Mhz. This means that you will be able to see your HF transmitters harmonics even if they are 70 db below the carrier : quite a useful thing. You will be able to measure the IIP3 of mixers, amplifiers with a few simple attenuators. If all this is confusing, think this way : this equipment will be enough for you to design and measure the performance of all your HF rigs, antennas and linears.How does it work?
The Ardiuno that controls the Specan is a very flexible microcontroller board that you can program in simple C language and download through a USB port from your PC. It costs just a few dollars. This build used a free version of it called the Freeduino. The Arduino provides four functions Tunes the Specan by controlling the frequency of the Si570 as the local oscillator Switches between the two IF filters of 300 KHz and 1 KHz under program control Handles manual tuning, display and the function switch on the front panel Communicates commands and data with the PC over USB in a simple text format The rest of the Specan is just a receiver that covers from 0 to 70 Mhz in two bandwidths : 300 Khz and 1 Khz. Unlike a regular receiver that demodulates the signal to audio, the Specan converts the amplitude of the tuned signal to its decibal value through an amazing little 8 pin chip – the AD8307 from Analog Devices. The Specan’s tuning is done by setting the 1st oscillator frequency. The first oscillator is another 8 pin chip – the Si570 that has a spur free, low phase noise output all the way to 200 Mhz. It costs less than 15 dollars here. The Si570 is in turn controlled by the Arduino through a two digital lines following a protocol called I2C. You don’t have to figure this out, Arduino and Si570 already understand it, we just hook it up and use it. Here is the block diagram of the Specan, it is just a usual double conversion receiver The incoming signal is filtered through a 4 section low pass filter before entering the 1st Mixer. We used a two dollar ADE-1 mixer from Minicircuits. You could choose a higher level mixer in it’s place, but this is what was available in the junk box so this is what was used. The 1st mixer is driven by a local oscillator that consists of the LVDS version of Si570 amplified by an MAV-11 MMIC. The mixer is followed by a strong amplifier (AMP1) that also consists of another MAV-11. This amplifier helps terminate the first mixer properly. (Yes, we did try bypassing this amp for the heck of it, it brought the input intercept down to 0 dbm, you could substitute it with a 6db attenuator pad with a drop in the noise figure). The AMP1 also provides a useful gain of 10db. The signals are then filtered through a band pass filter centered around 112 MHz and mixed in a second ADE-1 mixer (MIX2) with a 100 Mhz crystal oscillator. The output of the second mixer is in HF region, two low-cost 2N3904s are used in parallel as a high intercept post-mixer amplifier (AMP2). The 12 Mhz IF signals are routed through either a narrow band crystal filter or a wide band LC filter. The IF is amplified by the second IF amp (AMP3) to a level suitable for the AD8307 log detector. The AD8307 generates a DC voltage between 250mv and 2.2V as the log of the RF input with a 25mv per db ramp.
Building the Specan
 (This photograph is with the shields removed. the Si570 shown here was CMOS version without the MAV11 amp)
Here are a number of things you must know before starting to build the Specan
- The Specan is should be built on a large unetched board of 12″ by 12″. The original was built on a smaller, congested board.
- Each module is assembled on smaller unetched boards and tested. They are tack-soldered onto the large board by small wires.
- The front panel is also made of unetched copper clad board as well. The front panel is soldered to the base board.
- Many of these modules need to be shielded. The original article recommended Hammond boxes for shielding. These are expensive. Instead, the Specan builds shields around each of the module by soldering walls of 1 inch high copper sheeting available in the hardware stores. The sheeting is easily cut with scissors.
- A lid is fashioned out of more of the same sheeting and tack soldered to the walls of the shield. It works very well.
- Many of the modules use SMD components. In the absence of a PCB, a hobby knife can be used to cut pads outof the un-etched double side copper clad board. The components are mounted between the pads and between the pads and the ground plane.
- The ground plane on the top side is connected to the bottom plane by drilling a number of holes between them and soldering small pieces of wire.
- Small pads are cut at the edge of the module boards for power and signal lines. The copper shielding has small apertures cut out to allow the lines through the modules. These apertures should be just wide and high enough to avoid shorting these pads to the ground. See the close-up pictures.
- Keep the LM1117 regulator far away from the Si570 to avoid tempurature drift. Use a well regulated linear supply with the Specan.
- In case you don’t hear it right that last point, let me repeat i: Use a separate, regulated, linear supply. DO NOT use the same power supply as the one for the device under test. I’d recommend building one inside the cabinet of the Specan. I didn’t do it and this build suffers from RF leaks when I accidentally use the same power supply for the units under test and the Specan.
- Mount the LPF module such that the shield directly solders to front-panel to avoid picking up the RF from Arduino and the Si570 wires.
1 – Hooking up the Arduino
To use the Arduino in the Specan you don’t need to know any programming! You just download the Arduino code from the net and upload it to the Arduino. We should all be very grateful for the Arduino board. It is a two dollar microcontroller on a board. The really amazing thing about the Arduino is that you program it in simple C language without messing about with assembly language. For writing these programs, a very easy-to-use IDE (Integrated Development Environment) is freely available from www.arduino.cc. The entire program of the Specan for the Arduino is available under General Public License. You can download it from https://github.com/afarhan/specan. The Arduino has a two rows of female connectors on either side. Here is what it looks like: The Specan uses Pin 2 to Pin 7 from the top row of connections and Analog pins 0 to 5 in the lower row (see the above picture). In addition to that, the USB port is used to talk to the PC. The Arduino is usually set to take power from the USB port. We want the Arduino to work even without a PC connected, hence we power it from an external 5v regulator. This is how you prepare the Arduino :
- Move the PWR jumper on the Arduino from USB to EXT.
- Mount the Arduino on one corner of the Specan’s box. Our Specan used 1/2 inch brass stand-offs to mount the Arduino.
- The mounted Arduino should have its USB port peek out of the front panel through a small aperture (to avoid RF leaks)
- The display should be mounted right on top of the Arduino so that the wire lengths are short.
- The Arduino takes a general purpose board with male pins that mate with the sockets on the Arduino. You only need two rows : for pins 2-7 and pins A0-A5. This general purpose board also has the 5v regulator for the Arduino.
- Solder or bolt a shield around the Arduino and the LCD display. A wall of thin copper sheeting (used in transformers) was soldered around the Arduino to prevent the RFI from the Arduino from getting into the rest of the Specan. Small apertures at the bottom of the shielding were left out to allow the control and power lines to run to the Specan.
 Once your Arduino is all wired up, you can load the Specan program into it. Here are the steps:
- Install the Arduino IDE on your PC from www.arduino.com.
- Download the specan.ino file from here.
- Connect an Arduino through the USB cable to the PC and power it up.
- From the Tools > Board choose the appropriate model of Arduino board that you have.
- From Tools > Serial Port choose the serial port of the Arduino.Choose the specan.ino from File>Open menu of the Arduino IDE and press the upload button.
- Keep the contrast control at the half-way mark. You may have to turn it up or down to get the LCD display going.
 The Arduino controller is under the veroboard. The log amp is on the right
2 – Building the Si570 Oscillator (Use only the LVDS version!)
In many ways, the Si570 oscillator is a key component of the Specan.- It is a reasonably low noise oscillator
- It is easily controlled by a microcontroller like the Arduino
- It can be soldered dead-bug style just like an LM386.
- It works into the UHF range!
- Unlike a DDS, it has no spurs
- Assemble the Si570 oscillator on a small one inch by one inch board.
- Solder the Si570 upside down. The chip is held in place by a very short wire from pin 3 to ground and the two powe supply bypass caps mounted as close to pin 6 as possible.
- Score off small pads (prehaps with a dremel) at the edge of the board to take in the lines from the Arduino and power.Make a separate pad for the RF out.
- Make sure that the power to the Si570 board is indeed 3.3v (and not 12v!).
- Mount the LM1117-3.3v regulator separately with sufficient heatsink. It will consume more than 1 watt of continuous power. The extensive bypassing on the power line of Si570 is to keep the digital noise of the Si570 from going out and the Arduino chatter from coming in. Strap down the wire bundles going to arduino and power with small loops of wire soldered to the board and twisted tightly. Keep them away and perpendicular to the RF signal paths.
- Testing the Si570 module
- Attach the wires to the Arduino, power line and switch on the two modules.
- Check that the pins 6, 7 and 8 report 3.3v.
- Load the Arduino with Sweperino sketch. Download it from https://github.com/afarhan/sweeperino
- Move the tuning knob around, you should see the frequency of the display change.
- Set the Specan’s display to 10.0000 Mhz
- Connect a frequency counter or monitor the output on a radio. Note the frequency. It will be close to 10 Mhz.
- Take the actual frequency measured by your counter/receiver and plug it into this formula: (10.000 x 114326895)/(Freq in Mhz)
- Now, open the Arduino’s sweeperino.ino and scroll down to the line that reads
- #define FREQ_XTAL (114326895) and replace the number with the newly calculated number (it should have 9 digits as well). Upload this file again
- Now, restart the Specan and tune up to 10 Mhz. The frequency should be spot-on in the receiver/counter. Now, open the specan.ino source code file and replace the #define FREQ_XTAL with the same value as above, upload specan.ino to the Arduino again.
 The Si570 without the MAV11 (these pictures were taken before I switched to the LVDS version of Si570)
3. Building the 8307 Log detector
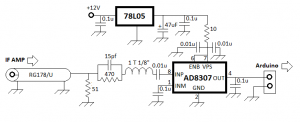
The Specan has to display the power of RF signals in decibel scale. A great challenge in building a spectrum analyzer is to build a perfect log detector that can convert the RF power to a dbm readings. This problem is now eased with the availability of the AD 8307. This part is available for a couple of dollars. It provides a 90 db range with 0.2db accuracy! It is pretty simple to make. Here is the circuit :- Assemble the log amp in a small board using SMD components.
- Cut pads into the unetched copper to take pins of the AD8307.
- The regulator has to be on the board.
- Bring out the RF in, Output and the power lines to pads at the edge of the board.
- Solder a 1″ high ‘wall’ of copper sheeting all around the module, leaving small apertures for those tabs. A bit like dog flaps in the door.
- Now, power up the AD8307 and test it.
- With nothing connected to the RF input the output should read between 0.25v and 0.4v.
- Connect the AD8307 to Arduino’s pin A2.
- The Arduino should now start displaying the power readings.
- Connect the output of the Si570 with a very short coax to the AD8307.
 The AD8307’s power reading are un-caliberated at the moment, but our initial alignment only needs relative readings.
4. Filters – Building the 70 Mhz low pass filter
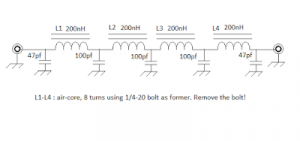
 The Specan has a total of four filters that need to be carefully built and shielded. The 70 MHz low pass filter is the simplest of them all.
Each of the coils is made by winding 8 turns on 1/4-20 bolt as a former. Remove the former after winding the coild. They are best made with silver wire, we used 22swg copper wire in the prototype.
A strip of five pads is cut in a double side PCB. The coils are soldered across the pads. The capacitors are soldered between the pads and the ground plane. Keep all the caps on the same side of the strip. Drill a number of tiny holes on the PCB and solder small pieces of wire to extend the ground plane to the bottom side as of the copper clad board as well.
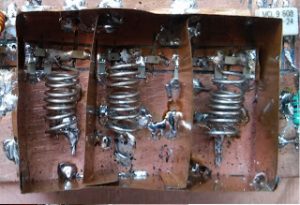
The entire filter is shielded and a each coil is shielded from the other as well.
Small flaps are left out on the two ends of the shield to bring the input and output to the other parts of the Specan.
The LPF filter can be tested easily with the Sweeperino
- Connect the sweeperino to the LPF’s ports
- Download the specan.exe from https://github.com/afarhan/specan-ui
- Now sweep the LPF with the specan.exe (See the videos for details on how to use it)
- Your LPF is now tested.
 Note : the coils are shielded from each other. the final shield around the BNC connector is not shown here
5. Filters – Building and Aligning the VHF bandpass filter
The original VHF bandpass filter proved a challenge. The coupling called for gimmick capacitors that were difficult to setup properly. Instead, a simple to make VHF bandpass filter was designed using only fixed value capacitors. Here is the circuit: The circuit is assembled on a double side, unetched board with seven pads of 0.2 inches each made in a row with a box cuttter. The 2.2pfs are soldered between every pad except the end pads that have 4.7pfs. The 10 pf capacitors are soldered between every pad and the ground. Keep all the 10 pfs facing one side. Solder the coils’ ground ends on the same side as well. All capacitors are SMD.
Shielding the VHF filter is very important. Solder the a 1 inch walls of copper sheeting or copper clad between the coils. Take care to cut small apertures in the bottom of the shield to prevent the copper pads from being shorted to the shield.
There were no 4.7pf capacitors in the junk box, we used two 2.2pfs in parallel.
Aligning the filter is not difficult at all.
- Connect the Sweeperino’s input and output together with a cable
- Enter “f112000000” (without quotes) on the Serial Monitor of Arduino’s PC software to set the Si570 frequency to 112Mhz. Note thpower reading on the LCD as the reference reading.
- Connect the filter to the Sweeperino.
- Desolder the ground end of L6.
- With a long nose plier, grab the ground end of L6 and drag it over the ground plane, expanding/contracting the turns for the best reading on the LCD display. Solder the ground end of L6 at the best spot.
- Repeat this with L7 and L8.
- Now solder the remaining side of the copper shielding around the filter.
- Run a full sweep of the filter from 70 MHz to 130 MHz with specan.exe

6. Filters – Building and aligning the two HF filters
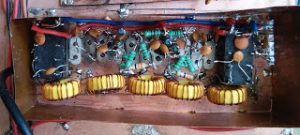
 The wide HF filter uses 5 resonators. The inductors are wound on T50-6 toroids. They can also be air wound if the one can expend the extra effort of shielding them individually. We used a copper clad board about 4 inches long and 2 inches wide to accommodate both the HF filters and the switching relays. The entire module of HF filters is shielded with copper sheeting. There are two outlets at the two ends for input and output. The power and filter selection lines are well bypassed while bringing them inside the shield to prevent stray RF pickup.
This wide band filter is assembled on a single strip of pads cut into a copper clad board similar to the VHF band pass filter. Aligning them is similar. Set the Si570’s output to 12 Mhz with ‘f12000000’ command from the Serial Monitor and peak the output by moving the turns on each of the them for the best response.
The narrow band filter needs no alignment. Just use 12 Mhz crystals that were matched to within 100 Hz of each other. All the nine crystals need to be matched to each other. Solder the bodies of the crystal to the copper board.
7. The 100 Mhz oscillator
 Building overtone oscillators has been a challenge in the past. This new design is based on the work of John Stephenson, KD6OZH in the QST of November, 1999. It is a very low noise oscillator – exactly what is needed to complement the low noise of Si570 in the first oscillator. This version oscillates very easily and without needing a coil in parallel with the crystal.
Tuning up this overtone oscillator is an old trick from EMRFD. Replace the crystal with a 22 ohms resistor in series with a 0.01 uf capacitor. Switch on an FM radio nearby and tune it to exactly 100 Mhz (use a radio with digital display). Compress and expand L10 until you can hear the signal in the FM radio (the signal will appear to make the radio dead silent). Tune the radio around and confirm that the peak of the signal (maximum quiteness) is at 100 Mhz. Now, replace the resistor and capacitor with the crystal. You should be able to hear the signal again. You might have to (very lightly) touch up the L10 for proper oscillations.
8. Building the IF strip
The IF strip has more than 35db gain. As the AD8307 has a response from 0 to 500 Mhz, the output of the IF amplifier has to be tuned to 12 Mhz. Set the Si570 to 12 Mhz and inject the signal into the IF amplifier. Peak the L17 for maximum response.9. All together
Once all the filters have been aligned, bringing the Specan together is a fairly straightforward and simple job of hooking it all up together. The rest of the modules : the mixers and the amplifiers are all broad-band and simple to make. They don’t need as much shielding or alignment. Check the full circuit diagram and the pictures for the parts layout.10. Using the Specan
The video shows how it can be used as a stand-alone measurement receiver or as a spectrum analyzer. Briefly this is how the controls work11. Manual operation
- The tuning knob tunes from 0 to 100 MHz in 100 KHz steps.
- A click on the function button switches between fine tuning and coarse tuning. The fine tuning tunes in 100 Hz steps.
- Press and hold the function button to switch between narrow and wide resolution bandwidths.
Leave a Reply